Pages

Showing posts with label fabric. Show all posts

Tuesday, December 3, 2013

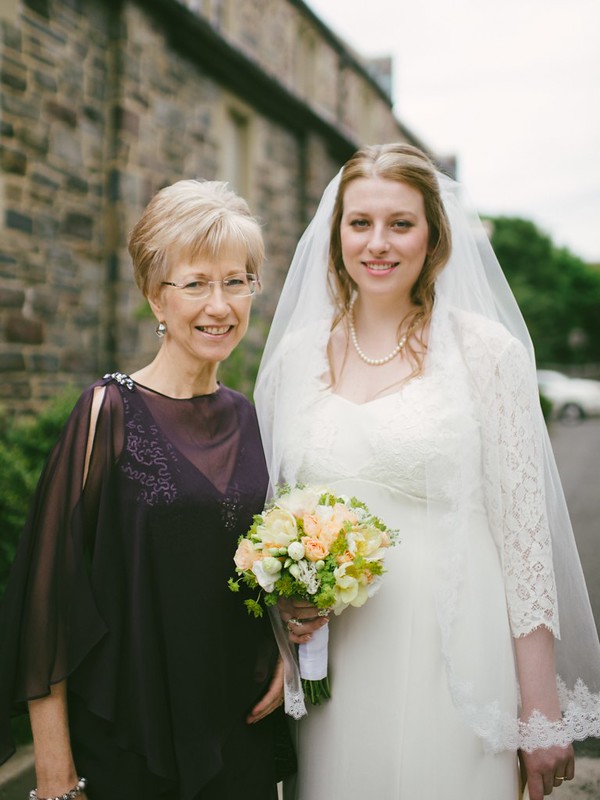
Details: How I Made My Wedding Dress

It has take me a LLOOOooooong time to get around to writing about the details of making my wedding dress. This post is not quite as detailed as I'd like (ahem) and ends rather abruptly but I'm a sewist, not a writer and this post is past due so get a drink and settle in, this is a long one with lots of photos & links.

So... exactly how did I go about making my wedding dress?
Lots of research and planning followed by lots of work!

Planning

Major Design References and inspiration:
The elements that I wanted most were lace and sleeves.  I was going for a traditional, vintage look so pouffy and strapless were out. Favorite designers were  Claire Pettibone, Temperly London, Jim Helm, Carolina Herrera (Twilight, Bella’s wedding dress), Kate Middleton (the lace bodice w/ sleeves), Dolce and Gabanna, and of course a million pins on pinterest. Rather than repost a bunch of inspiration pics, just go check out my pinterest board if you are so inclined. 


Patterns I considered
Vogue: V8766V1032
Butterick: B5731B5779
Kwik Sew: K3401
Simplicity: 1909

Musin Making
I started in December (6 months out) I made a bunch of muslins. Most of them were disappointing and would have required a lot of and Franken-fitting. Once I had settled on a pattern and made the muslin for it I was THRILLED with the look and fit. The minor corrections that I made for fit were: shift shoulder seam back ½”, raise armhole ½”, reduce each back seam 1”, and reduce each under-bodice side seam ½” at top; reduced the front neckline at the princess seams and increase front bodice princess seam length at empire seam (this adjusted the fit for my full bust). Then I made a second bodice muslin and replaced the first one. It fit fantastically (I wore it for over an hour because I was so excited). I had marked the shorter train length on the muslin and decided to go with it, but added 6” at the center back so that it would be a little longer. I had also made elbow length sleeves for the first muslin but decided to go with ¾” length sleeves for the final version.

Simplicity 1909,  the clear winner of the muslin stage.
The Result

Materials

Fabric Shopping
Chic Fabrics – Silk Charmeuse lining, Cotton Batiste and Cotton Muslin.
My home away from home. 
Lace Star / Fabric & Fabrics - Silk crepe for the body, gorgeous alencon lace. This place has a fantastic selection.
This is the lace I chose. It was the single most expensive part of the dress. 
Mood Fabrics NYC – Silk Organza for underlining the bodice
Lennox Fine Fabrics - Silk Rayon Illusion Tulle (for the veil). 108” wide, 1.5 yards. I cut it down to 75” wide, which I think it may have been a little too wide.

Trim Shopping:
Top Trimming: Spiral Steal bones (which I didn’t use after all), clear comb, alligator clips, & french netting for the veil and fascinator.
Top Trimming - one of my new favorites
Pacific Trimmings: Gutterman thread, gold Riri Zipper with ivory cotton tape, gold hook & eye, silk pins, ribbons, etc.
Daytona Trim for Lace (for the Veil), and ribbon for the bustle.
I am so very in love with this lace and I've got like 9 yards extra!
MS Schmalberg for silk flowers, which I didn’t end up using, but wish I could have!
Pany Silk Flowers in the Flower District where I found the silk flower for my fascinator.
Manhattan Wardrobe Supply for a padded satin hanger and wedding dress garment bag.

Construction Research

My favorite sewing reference books
Books
Susan Khalje’s Couture Wedding Dress (not pictured) – I bought the CD, but I really didn’t like reading this as a digital book. The focus is on the specific construction employed in the example dresses (one of which I got to see at the Mood lace seminar). It isn’t exhaustive and doesn’t explain many alternate methods. It’s a good book, but I needed other references for my specific dress.
Reader’s Digest Complete Guide to Sewing – My old college standard and in my opinion, any edition of this book should be on every sewist's bookshelf. I also have the Complete Guide to to Needlework and I freaking LOVE it.
Vogue Sewing – this one is pretty good, but I usually look here to see if it differs from the Singer Sewing Book.
Couture Sewing Techniques by Claire Scheaffer, obviously.
Sewing Specialty Fabrics - Singer Sewing Reference Library - I collect this series; it's great!
Claire Shaeffer's Fabric Sewing Guide - this is a great reference for all construction options for specific types of fabric. I relied on it a lot.
Singer Sewing Book by Mary Brooks Picken – This is my favorite vintage sewing reference book. It also has a nifty logo that I think would make a great sewing themed tattoo.

Sewing Tattoo perhaps?
Classes
Craftsy: The Couture Dress (Susan Khalje) – excellent, I highly recommend it especially for the muslin making and the finishing touches.
Craftsy: Vintage Inspired Veils for the Modern Bride (Doreen Vandermeer). Pretty useful for the materials and techniques, but I had to go it alone for the lace application on my veil. I searched ALL FREAKING OVER for a flower that was nice enough to use on the fascinator but low end enough that it could be taken apart and reconstructed. Details on that in a future post (but no promises).
Mood Sewing Seminar: Lace (Susan Khalje) – I am SOOOO glad I was able to ask Susan some specific questions about choosing a lace and construction methods. She went over the specific types of lace and their applications. Susan also talked me into buying her book on CD and I got to chat with some of my favorite bloggers Daughterfish, Oonaballoona and Marina.
Susan Khalje at Mood
So with a muslin that made me happy, and avalanche of materials and reference sources I got to work making The Dress.

Construction Details

I cut out all my muslins, the silk crepe and the silk charmeuse on the large cutting tables at work. I used a bunch of cheap lightweight cotton muslin as a bottom layer to sandwich the silks between (muslin/silk/pattern) which helped prevent slipping and keep the fabric grain straight.
Serrated scissors, fabric weights and lots of space.
Cutting the charmuese lining
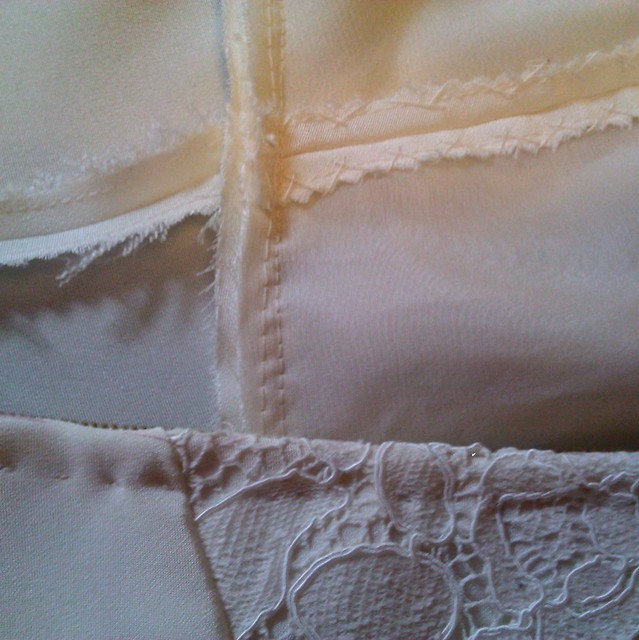
All seams were lock-stitched, pressed open and the allowances were stitched and pinked. I tested out french seams and also zig zag and pinked and the option I went with was the least bulky. I pressed all the seams with a silk organza press cloth, a clapper presser, and no steam.
The seam treatment on the right wins
I sewed and hemmed the skirt pieces before assembling them with the bodices.
I knew it was extremely unlikely that my skirt would be too long and I’d already made 2 muslins so I felt comfortable pre-hemming. This was also the way the pattern instructions were written so I think that a fitting is expected for this level of project. The lining hem is a ¼” double bend-back.  The body hem is machine blind-stitched using lace hem tape to reduce bulk.
Machine Blind Hem - not very couture, I know.
I originally wanted to do a hand rolled hem, but it would have taken too long (time management decision!) and my test looked rather thick. I am reasonably happy with the results, but it looked a little scary before I pressed it.
Pressed Blind Hem - with lace hem tape
The crepe under bodice is underlined with silk organza. I basted the underlining to the self with silk thread. I wish I had used two layers of organza, or purchased a heavy weight organza. Looking back I would have tested out different weights, but good silk organza is NOT cheap. I catch stitched the bodice seams open.
Silk Organza Bodice Underlining - glass head pins and serrated scissors
I further stabilized the (crepe) neckline edge with bias strips of silk organza that I steam pressed (learned this trick at the Mood lace seminar from Susan and Marina).

I cut the lace over bodice at home so that I could lay out the pattern pieces and ruminate on it for a while before committing to cutting.
The pattern layout diagram wasn't very descriptive.
Aligning the scallop valley with the shoulder seam-line.
I took 24 hours to place, fuss and decide on the placement of the pieces in a way that would make the best use of the scallop edges. Finally I worked up the nerve to cut my precious, expensive, french alencon lace.
I left myself plenty of margins for overlapping motifs

I then thread traced the pattern pieces with blue thread.
Working at night makes for crummy instagrams
My basting stitches were uneven (the front face had longer stitches) and I would advise against this because the seam line got sort of blurry while I was sewing it together. In hindsight, I would recommend about a ½” stitch length with even stitches on both sides of the lace.
Thread traced seam allowances and notches
Front bust dart & planned cut line
I used a combination of seam methods for the lace over bodice. The side seams and sleeve seams were lock-stitched, pressed open and catch stitched flat.
side seam allowances pressed open and catch stitched
The shoulder seams were lapped and hand appliquéd where the motifs allowed and lock-stitched, pressed open and catch-stitched were the motifs did not work. The armholes were lock-stitched and bound with pressed silk organza bias strips.
Armholes bound with bias silk organza 
The bust darts were lapped and appliquéd by hand with silk thread; that was by far my favorite part.
Dart test swatch with lime green catch stitches
At this point I stalled for a few precious days (less than 3 weeks to go!!!) because I wasn’t sure if I would need straps (as the pattern) or boning in the lining seams to help hold up the bodice. I decided to go with straps but this required some extra fitting to ensure the strap length was correct.

With time running out I made a list of all the last steps and got real busy crossing them off!

Before attaching the bodice lining to the skirt lining I inserted 1/8” wide satin ribbon at the side seams/empire seams for hanger loops. I tested the length out on the padded hanger that I bought for the dress. I wanted the loops to both hang around the hook of the hanger.

The lace over bodice to the crepe under bodice at the empire seam.
The bodice lining is attached to the bodice at the neckline edge. I machine lock stitched and under stitched the seam allowances toward the lining.

Once the self and the linings were assembled together I tacked the side seam allowances together (inside where no one can see) at the empire seam. This was to ensure that the hanger loops would be supporting the entire dress and not just the lining.

I hate installing zippers as a general rule, but sewing it by hand with the best materials was such a pleasure.
hand picked zipper application
Silk thread, hand picked zipper
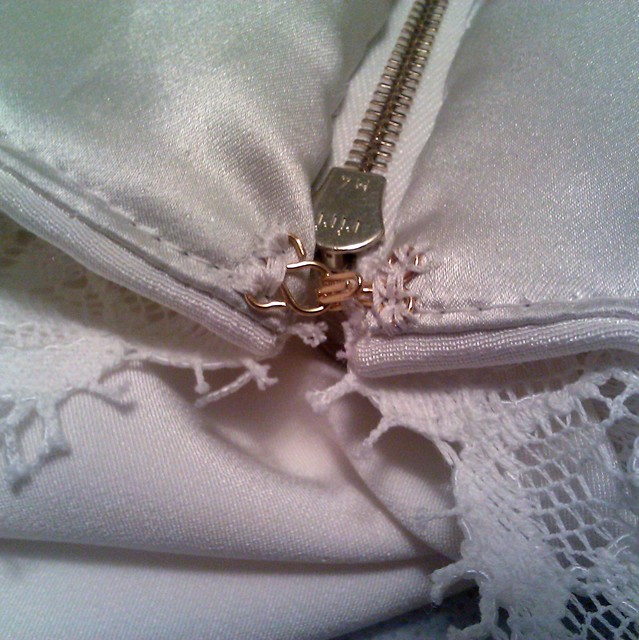
My RiRi zipper has gold teeth and ivory cotton tape. I hand picked the zipper using silk thread doubled.
Here you can see the bodice seam allowances catch stitched to the organza underlining.
Then I fell stitched the charmuese lining to the zipper tape on the inside, and a gold hook and eye at the top finished the top edge. 
Charmuese lining is so lovely.
My Zipper is so pretty!
Gold hook and eye - my stitching is not so great though.
For finishing touches; I tacked the under-bodice to the lace over bodice at the side seams near the top of the under-bodice; I made thread chain stitch carriers for the straps at the front empire seam and at the shoulder seam to ensure that the straps wouldn’t peak out from the lace. This also helped prevent the lace from slipping off my shoulders.
Thread loops at the shoulder seam to hold the straps
One final fitting (thanks Sara!) to decide on the bustle points and I then took 18 hours to decide between buttons or hooks; at the last minute I went with ribbons instead because I decided I didn’t want anything visible on the outside and I also saw a great tutorial on You Tube on how to use them.
Hook or button? How about neither?!

The fascinator and veil were the very last things that I did (day before the wedding). I worked on the fascinator on the afternoon before the rehearsal and I made the entire veil, from start to finish between 10 and 12 pm after the rehearsal dinner.  I may blog about them eventually, but I posted about those projects on my craftsy page so you can check it out there for now.

And that is the end of this post for now. I may edit to add more photos or additional details later.
Let me know if you have questions!

Friday, September 14, 2012

Update: I've been busy


Just checking in for an update. No time for pics, just details:

Slow Sewing:
I managed to finish my Alabama Chanin green tunic/tank and a plain grey corset tank. I made everything in the XL size, and I think they may be a bit too loose for plain and moderately embroidered styles. Next time I think I need to take at least ½” off the back shoulders because the seam very forward on my shoulders (my back is kinda flat, my front is not so much) as well as raise the front neckline 1”. In the pipeline for the Alabama Chanin slow sewing is a blue sleeveless bolero and a pink retro panty and bustier set (burdastyle pattern). After a fruitless search of the interweb I ordered a yard of the pennant felt from Alabama Chanin which is slated to become a Paisley stencil and an Angie’s Fall stencil. I also bought a craft airbrush. 

Sew-Sew Summer:
I made a few dresses this summer to varying degrees of satisfaction. Hazel, which has a weirdly shaped facing (size 12 - am I the only one?) does not flatter me but the fabric is awesome and I wear it anyway. I also made a Tiered Maxi dress with that burdastyle pattern that is so popular. The fabric is a delicious Italian cotton floral, but without trim looks a bit like a nightgown. Also, the side zipper itches my tender flesh and is kinda unnecessary since I can pull the dress on over my head. I need to pick the zip out but the side seams will be different which bugs me. I want to make another version; short, no zip from a rayon challis floral with some wee trim at each tier. I cut a BS Fatima dress, but the fabric is noisy so I’ve lost interest half way through sewing it. I also cut a long striped jersey maxi dress but I need to take it in at the side seams (damn Big4 sizing again!) and it’s tricky to get the stripes to match up the 2nd and third time I stitch the side seams.

Chanel Jacket Update!
I attended a 90 minute “class” at Mood NYC this week with Susan Khalje where she went over the methods employed in making a classic french cardigan jacket. The class was very informative but I didn’t learn a whole lot of new information. I did find it helpful to go over everything in detail with a master couturier and I immediately got my Chanel jacket mojo back after seeing several ladies try on Susan’s famous samples. I brought both of my patterns to the class and Susan mentioned that she prefers the v7975 pattern to the newer v8804 pattern due to the built in shaping in the pattern. She said it is possible to convert a 2 piece sleeve into a 3 piece by splitting the upper sleeve vertically from the shoulder notch. She also discussed the dimensions and shape of the canted sleeve vent. Also worth noting; Susan uses silk organza to interline the top portion of the side front and back panels in order to stabilize the armholes. Overall I felt encouraged that the techniques employed, although labor intensive, are not terribly hard or complicated. No need to over think it. I confess, the pattern instructions in v8804 intimidated me with its specificity and additional construction techniques.

ETA: I found an AMAZING flicker set for the new Vogue pattern 8804. It makes me want to give that pattern a muslin. I think the sleeve is intriguing. Much of the online discussion about this pattern has been in regard to the "strange" grainline of the front top sleeve pattern piece however Claire Schaeffer herself weighs in on the subject in this flicker set!

Moving onward; last night I decided to remake my muslin in a larger size (16) using more traditional couture methods which I learned from Susan’s Craftsy couture dress class. One tip I will share is how I was able to easily transfer the pattern to the muslin. I have a Clover tracing wheel that has two adjustable wheels. The wheels are blunt so they don’t pierce or otherwise damage the tissue pattern. I set up the wheels 5/8” apart so that as I traced along the cutting line with the outer wheel the inner wheel traced the all important stitching line. This made it possible to skip drawing the cutting lines onto each pattern piece. I’m going to fit the sleeve as a two piece but I will draw the vertical seam line on it so I can check the placement.

Confession: I also bought a black tweedy boucle, complimentary silk charmeuse and thread for a 2nd Chanel jacket for fall. I will need to find appropriate trims later.

Knitting:
I participated in the Ravelympics, no wait, EXCUSE me, the Ravellenic Games. I did not medal (drat!) but I did finish my sweater. I love it, but I have no acceptable photos for the blog. Ravelers can check it out on ravelry.

I impulsively started a traditional aran fisherman sweater (stash busting, I swear) and I am already on the 2nd sleeve. It’s interesting and easy enough; great for tv knitting and commuting.

I need to cast on for me wedding shawl (to say nothing of my DRESS) but I am distracted by my current intarsia obsession. It’s all Kafe Fassett's fault. I found a 2nd hand copy of Glorious Knits and I am dying to make a carpet patterned (kilim inspired) cardigan jacket for fall. I’m going to Lion Brand Yarn Studio this evening for an event. I might end up purchasing a sweater worth of Amazing. If I do, it’s allowed because I finished my Ravellenic sweater with stash yarn and my current sweater is also stash yarn.

Studies:
I got an A in Patternmaking II. Hurrah! I am now enrolled in Patternmaking Jackets and Suits for the Fall semester at FIT. Learning to fit a jacket is supper helpful for work and especially for the Chanel jacket project. I am much more confident about fitting the new muslin. Two of the important things that I've learned so far are: 1) the Shoulder Slope is critical to the overall fit of the jacket, and 2) the Collar Sweep (outer edge of the collar) is critical to the shape and break of the lapel. If the collar sweep is too long, the lapel will break too high, if the sweep is too short, the lapel will break too low.

Sunday, July 8, 2012

Alabama Chanin: Finished Details

I'm all done with my first Alabama Chanin Camisole top! I love it.
I adored making it and I'm looking forward to finishing my more basic (by comaparison) corset and tank top. 


I've worn it twice already. It feels kind of heavy, but I suppose it should since it is two layers of medium weight 100% cotton jersey. I'll bet the one layer tops will be a bit lighter to wear. 
Also, we're in the middle of a heat wave right now and all I want to wear is billowy batiste and voile. 


You can see some of the left over logos from the t-shirts at the back under arms.
Proof that I made this out of recycled materials.


I think the pink is very bright. If I hadn't thrifted the t-shirt I probably would not have gone for such a "Barbie" pink. 


I used the herringbone stitch for the bindings. It was pretty easy, but it used up a LOT of thread. I confess to using a much longer length of thread than prescribed for the binding, but I made sure to love that thread a lot longer than usual. 

I'm trying to finish up a green tank and a charcoal grey corset, but I think I might do a bolero in blue with white stars embroidered on it. I'm belatedly inspired by the 4th of July and the star trend that's happening this summer.

Saturday, May 26, 2012

Slow Sewing: Alabama Chanin

I have been bitten by the Alabama bug.

Like many other similarly obsessed artisans, I have taken up my needle and thread and I am slowly sewing some tops out of recycled t-shirts. This new hand stitched clothing project began after I treated myself to the Alabama Studio Sewing & Design book. I have been wanting to purchase one (ALL) of the Alabama Stitch books for a while, but I could never decide on which one to get because I like all the patterns equally. The only reason I got the 3rd book instead of the first (I am DYING to make the corset) is because the third book looked to be the most comprehensive in terms of techniques. Well, about a week after I received the first book I ordered the Studio Style book because I decided I need to have those patterns also. 

So, with my start-itis in full swing I decided to make some comfy tank tops. 

One top is from the Sewing & Design book;
CF & CB seam tank top

and the other is from the Studio Style book:
Princess seam tank top

First, I went to Mood and splurged on some organic cotton yardage ($12/yard, 2 yards), then I got nervous about what to make with my precious organic cotton so I went to my local Salvation Army and bought about 15 t-shirts to recycle. ($.99 each!).
 I found that XL and XXL with no side seams and only small printed logos work the best to get the most salvageable material out of.
3XL!!!! SOOOOooooo much green cotton!

Cutting the Pattern

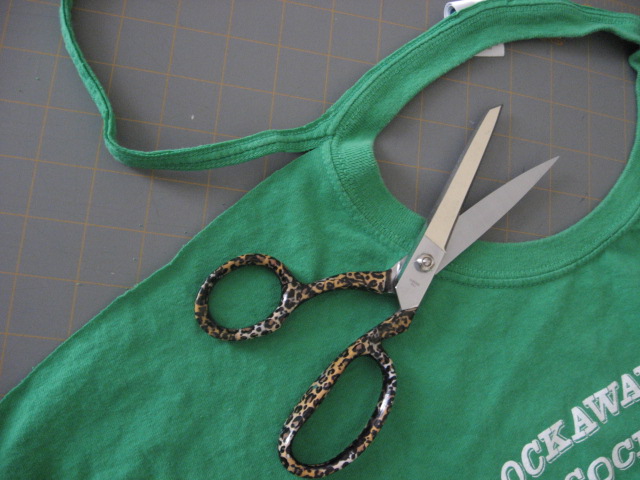
I cut off the sleeves at the seams, then snipped off the shoulder seams and the neck band.

I traced off the patterns** onto oak tag because I know I will use them again and they are easy to trace around with tailors chalk. I have lots of heavy jars and containers in my sewing room that I use as weights. 
I was able to get the entire tunic out of this t-shirt...

...plus a bunch of pulls.

Stenciling the Design

bought a little spray bottle at a local art supply store for a couple of bucks. It is especially meant for watercolor use, but to tell you the truth it is pretty generic. I will remember to save my next travel sized spray bottle.  I also bought some Jacquard textile paint (it requires heat setting) but when I got home and went through my paint drawer I found that I already had a bunch of Createx paints that don't require heat setting.   
The spray bottle works well, but I when the paint level get's low it starts to sputter. I also had a hard time (I didn't test enough) getting the right water/paint ratio. The info is in the books, but I just didn't do a very good job following those instructions. It worked fine with more water than necessary, but my first stencil suffered from all the water and eventually started to disintigrate. 

I started out with an oak tag Rose stencil, but cutting it took FOREVER and it hurt my hand. When it started to fall apart I quickly decided that the (pricey) sheet of mylar (also purchased at the local art supply store) was probably worth taking the time to cut if only to have a sturdier stencil. 

I traced the stencil using a sharpie.
Cutting it out sucked almost as much as cutting the oak tag, but this one will last longer. 

I used Scotch reposition-able spray mount to adhere the stencils to the fabric. It worked out pretty good. 

center front & back panels of the princess seam tank drying on a rack

I started working on the princess seam tank first. This one is is going to be a negative applique with bright pink center and purple sides. (2 grey, 1 purple, 1 pink, large t-shirts). I'm using navy button craft thread. 
 
I wasn't able to avoid the logo on the back side panels because I didn't have a large enough grey t-shirt. I don't mind. It reminds me that these are reclaimed materials.

I've made good progress in the last week. I'm trying to decide if I'm going to cut out the leaves as well. I'm thinking yes, and I'll probably add beads as well. 

I knew I had these beads for a reason.

The green top will be a single layer with embroidery and probably beading as well.
center seam tunic 

That's about it as of today. I hope to post more progress and finished pics, but don't hold your breath.


** The Sewing and Design patterns don't indicate wish seam is the center fron and back!!! As a fashion person I find this MADDENING!!! The only way I can even guess is to look at the shoulder seams. In theory the slant should tell me which side is center. 

Related Posts Plugin for WordPress, Blogger...