Pages

Showing posts with label Alabama Chanin. Show all posts

Tuesday, February 19, 2013

My Alabama Chanin Beaded Blue Bolero

My latest Alabama Chanin style masterpiece!


This is a beaded bolero from the Alabama Studio Sewing & Design book.
It's made from a single XL 100% cotton t shirt that I bought for $.99 at a Salvation Army. I placed the sleeve hem on the original sleeve hems. It's made from a single layer of fabric and stencilled in white fabric paint with the Paisely stencil that I downloaded here and stitched with silver lined bugle beads in two lengths and seed beads. I used the cretan stitch with smaller bugle beads to apply the binding. I also added a few swarovski lochrosen on the smaller dots in the paisely pattern.


I was inspired to make this project late last June as a run up to the fourth of July. I was seeing a lot of stars on blue clothing and liked that idea so I was originally thinking of using the star stencil, but in the end I thought that was a little too on-the-nose. I'm so happy with the way it turned out. It's very sparkly but the cotton makes it easy and comfortable. It's going to be a dress-up-or-down kind of garment. I can't wait till tank top weather to wear it! 


Some more info on the process:

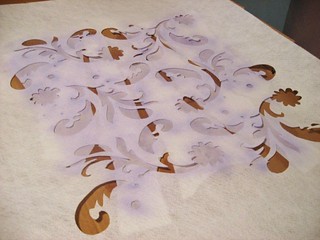
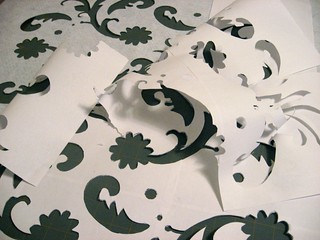
The oak tag and mylar stencils used on my last projects where a PIA to cut! It took too long and hurt my hands.  I can confirm that the purchase price of a stencil from Alabama Chanin is totally fair and if I didn't want them all I would consider buying one. Alas, I can't afford them all so for this stencil I decided to try another material. I spent some time researching "pennant felt" as it is described in the books. I searched all over the interweb and was only able to locate it on the AC website. I figured "pennant felt" must be a term that they use to describe a product that is available under another name but I haven't found it yet. I did purchase some craft felt from Dick Blick but it turned out to be very soft and thick; too fluffy to be a good stencil. I don't like not having options, but I do like supporting Alabama Chanin so I caved and bought 1 yard from them.


It's thin and firm and easy enough to cut, although still fairly time consuming. It's also fairly wide so I'll be able to get 2 stencils out of the one yard. The first one is the paisely stencil and I'm still deciding on the next one. I was going to cut either Anna's Garden or the Facets but now that the lovely Heart stencil has been added to the resource page I am even more conflicted! Let me know if you have a  favorite.
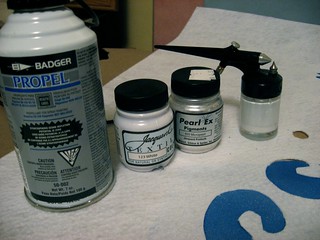
The cheap spray bottle that I used to stencil my first projects was starting to sputter and splotch and I knew that I wanted to make more stencilled garments so I went ahead and purchased a Badger Airbrush.


It's a little strange to use at first but I'm getting used to it.  I will need to get a larger bottle though because the bottles it comes with are quite small and I had to refill them twice for a corset sized project. Yes, I have an embroidered corset project in the works!


Unfortunately (or fortunately??) I need to focus on my wedding dress at the moment so it won't get any work until this summer so look for it later this year!
Wednesday, September 26, 2012

Alabama Chanin: Green Tunic Tank

  I've been wanting to post pictures for a while now. Here they finally are.


This top is super comfortable and flattering.
I thought I was going to do a bunch of embroidery, but I was undecided about what and how much, so I stopped after stitching the first stem. I left the stitching because it tells me which side is the front. Otherwise I really wouldn't be able to tell because the pattern pieces are very similar.

I am bustier than my form, so on my the shoulder seam pulls to the front.
Next time I use this pattern I will cut off 1 inch from the back shoulder so that the back pulls the front up a bit. I will probably raise the front neckline a little as well.  

I love the herringbone stitch so I used it to flat fell the seams open and to bind the edges. 
 And there you have it. I'm hoping to make a more involved piece soon with my new airbrush and a larger stencil. I'll be sure to post about that when it happens. 

Sunday, July 8, 2012

Alabama Chanin: Finished Details

I'm all done with my first Alabama Chanin Camisole top! I love it.
I adored making it and I'm looking forward to finishing my more basic (by comaparison) corset and tank top. 


I've worn it twice already. It feels kind of heavy, but I suppose it should since it is two layers of medium weight 100% cotton jersey. I'll bet the one layer tops will be a bit lighter to wear. 
Also, we're in the middle of a heat wave right now and all I want to wear is billowy batiste and voile. 


You can see some of the left over logos from the t-shirts at the back under arms.
Proof that I made this out of recycled materials.


I think the pink is very bright. If I hadn't thrifted the t-shirt I probably would not have gone for such a "Barbie" pink. 


I used the herringbone stitch for the bindings. It was pretty easy, but it used up a LOT of thread. I confess to using a much longer length of thread than prescribed for the binding, but I made sure to love that thread a lot longer than usual. 

I'm trying to finish up a green tank and a charcoal grey corset, but I think I might do a bolero in blue with white stars embroidered on it. I'm belatedly inspired by the 4th of July and the star trend that's happening this summer.

Saturday, May 26, 2012

Slow Sewing: Alabama Chanin

I have been bitten by the Alabama bug.

Like many other similarly obsessed artisans, I have taken up my needle and thread and I am slowly sewing some tops out of recycled t-shirts. This new hand stitched clothing project began after I treated myself to the Alabama Studio Sewing & Design book. I have been wanting to purchase one (ALL) of the Alabama Stitch books for a while, but I could never decide on which one to get because I like all the patterns equally. The only reason I got the 3rd book instead of the first (I am DYING to make the corset) is because the third book looked to be the most comprehensive in terms of techniques. Well, about a week after I received the first book I ordered the Studio Style book because I decided I need to have those patterns also. 

So, with my start-itis in full swing I decided to make some comfy tank tops. 

One top is from the Sewing & Design book;
CF & CB seam tank top

and the other is from the Studio Style book:
Princess seam tank top

First, I went to Mood and splurged on some organic cotton yardage ($12/yard, 2 yards), then I got nervous about what to make with my precious organic cotton so I went to my local Salvation Army and bought about 15 t-shirts to recycle. ($.99 each!).
 I found that XL and XXL with no side seams and only small printed logos work the best to get the most salvageable material out of.
3XL!!!! SOOOOooooo much green cotton!

Cutting the Pattern

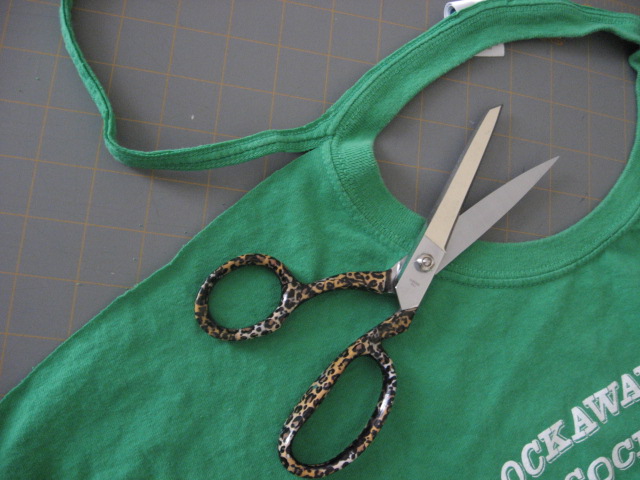
I cut off the sleeves at the seams, then snipped off the shoulder seams and the neck band.

I traced off the patterns** onto oak tag because I know I will use them again and they are easy to trace around with tailors chalk. I have lots of heavy jars and containers in my sewing room that I use as weights. 
I was able to get the entire tunic out of this t-shirt...

...plus a bunch of pulls.

Stenciling the Design

bought a little spray bottle at a local art supply store for a couple of bucks. It is especially meant for watercolor use, but to tell you the truth it is pretty generic. I will remember to save my next travel sized spray bottle.  I also bought some Jacquard textile paint (it requires heat setting) but when I got home and went through my paint drawer I found that I already had a bunch of Createx paints that don't require heat setting.   
The spray bottle works well, but I when the paint level get's low it starts to sputter. I also had a hard time (I didn't test enough) getting the right water/paint ratio. The info is in the books, but I just didn't do a very good job following those instructions. It worked fine with more water than necessary, but my first stencil suffered from all the water and eventually started to disintigrate. 

I started out with an oak tag Rose stencil, but cutting it took FOREVER and it hurt my hand. When it started to fall apart I quickly decided that the (pricey) sheet of mylar (also purchased at the local art supply store) was probably worth taking the time to cut if only to have a sturdier stencil. 

I traced the stencil using a sharpie.
Cutting it out sucked almost as much as cutting the oak tag, but this one will last longer. 

I used Scotch reposition-able spray mount to adhere the stencils to the fabric. It worked out pretty good. 

center front & back panels of the princess seam tank drying on a rack

I started working on the princess seam tank first. This one is is going to be a negative applique with bright pink center and purple sides. (2 grey, 1 purple, 1 pink, large t-shirts). I'm using navy button craft thread. 
 
I wasn't able to avoid the logo on the back side panels because I didn't have a large enough grey t-shirt. I don't mind. It reminds me that these are reclaimed materials.

I've made good progress in the last week. I'm trying to decide if I'm going to cut out the leaves as well. I'm thinking yes, and I'll probably add beads as well. 

I knew I had these beads for a reason.

The green top will be a single layer with embroidery and probably beading as well.
center seam tunic 

That's about it as of today. I hope to post more progress and finished pics, but don't hold your breath.


** The Sewing and Design patterns don't indicate wish seam is the center fron and back!!! As a fashion person I find this MADDENING!!! The only way I can even guess is to look at the shoulder seams. In theory the slant should tell me which side is center. 

Related Posts Plugin for WordPress, Blogger...