I love #bpNovember so much. Can we have it all year round? It's like sewing party all month on instagram.
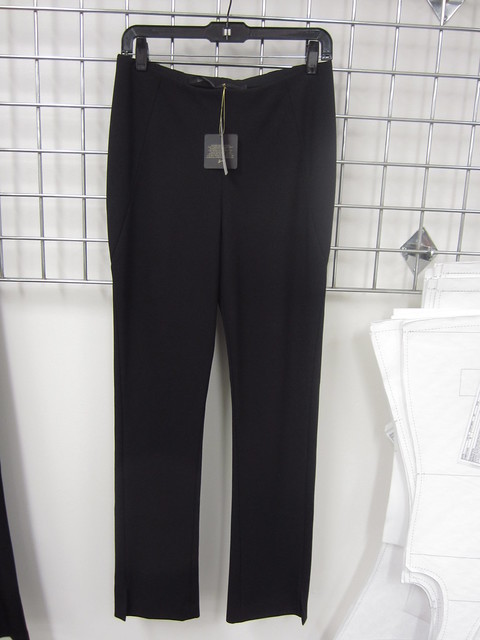
Even though I've been busy with school and work lately I've managed to finish a few things this fall that are totally wearable. Like, a chambray Lisette dress and a gorgeous teal green Sutton Blouse. I'm also chugging along on my knit cardigan project for my knitwear class which I am fancying up with a lining (a-la Chanel) and I'm about one more evening of TV watching away from finishing the binding on my latest baby quilt. No fancy ponte pants yet but I did sew up my own draft for class a few weeks ago (it's a winner, but a rather relaxed fit) and...AND I just came across a real Donna Karan pant sample and I was able to take some very detailed photos of the construction. You wanna see the photos?? Of course you do!
It had fewer style lines than Vogue 1378, but it does have the same curved hip style lines and it also has side slits.
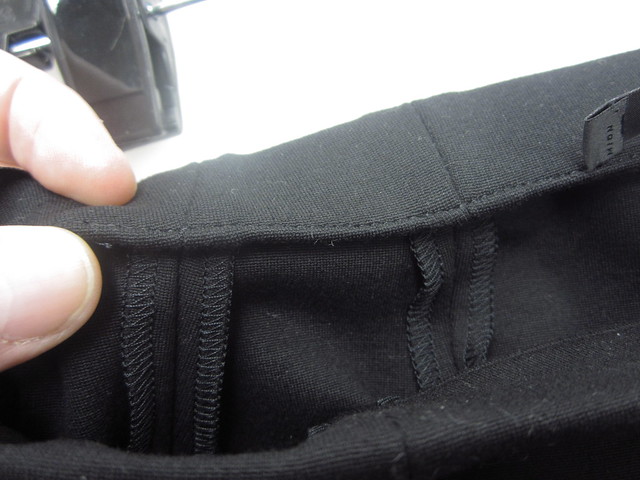
The waistband is straight stitched to the elastic on the inside. Clean on the outside. There are black satin 1/4" ribbon hanger loops at the side seam.
The waistband is then catch-stitched to each vertical seam allowance. I believe this is done by hand.
ETA: Notice how the front side panel seams are angled in at the waist... this adds a little subliminal waist shaping. The back legs have angled darts at the waist, shown below.
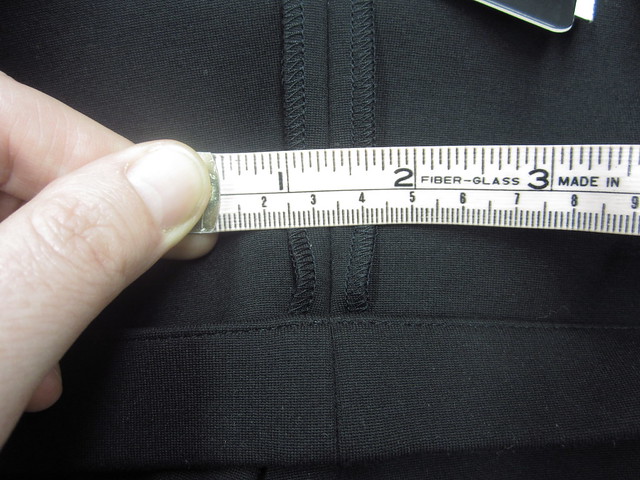
All the seam allowances are 3/8" finished width, 3 thread over-locked (serged/merrowed), pressed OPEN. The picture below is of one of the vertical seams and the bottom of the waistband... I'm viewing the garment upside-down.
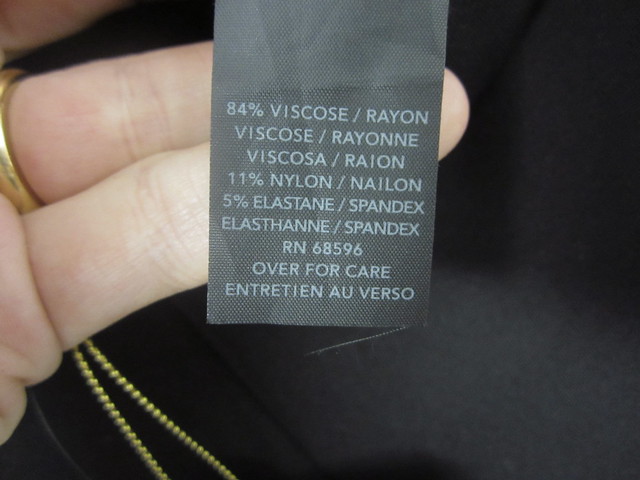
Fabric: 85/11/5 Rayon/Nylon/Spandex Ponte.It feels very nice.
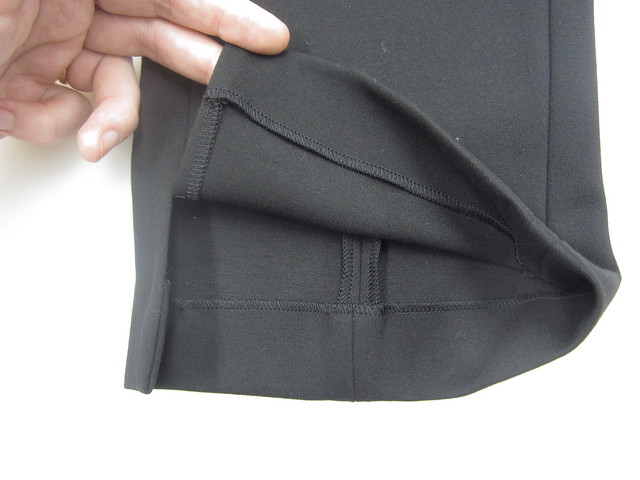
The hems are hand blind-stitched.
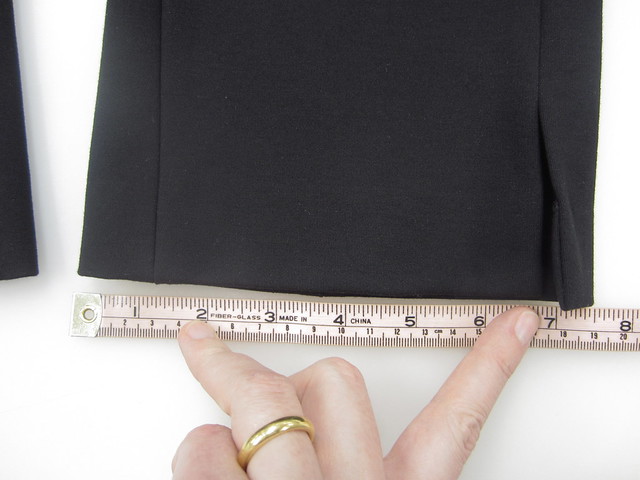
The Fronts are much narrower than the back at the hem, something my knitwear instructor at FIT taught us to do when drafting our knit pants.
I sooooooo need to get to work on V1378 ASAP.
Thursday, November 20, 2014
Monday, October 13, 2014
Ponte Pant Update & Fall Sewing
This weekend I sewed up my first pair of ponte pants (V8962). They were cut shortly after my last post and I was trying to clear it from my to-sew pile sine my knitwear class has progressed to the point of pull on pants (hello, ponte pants #2) and I was looking forward to having a commercial pattern tested and fit to compare to my own pant draft. I was thinking about how easy wardrobe staples can be a little liberating because the idea of filling holes in ones wardrobe with a tried-n-true pattern makes allows for tweaks and improvements with each attempt. As long as this first one went well (fit wise) I was ready and willing to tackle more of the pull on pants from my list.
The pants are now finished (wearing them now) and went together very quickly/easily. I lock-stitched each seam before serging it finished in this order: inseams, crotch, out-seams. This meant I could test the fit and make any adjustment at the out-seam.
One thing I have learned in school and at the company I work for is that most knitwear seams that are not simply serged actually sewn with a lock-stitch, not a stretch stitch. In production all the seams are merrowed (over-locked/serged) only, but when making samples or one-offs a straight lock-stitch is fine (with a ballpoint/jersey/stretch needle).
I used one of the stretch overlock stitches on my Bernina to attached the elastic and then stitched in the ditch at the center and side seams. I've been debating about weather or not to enclose the elastic entirely but I kind of like the clean, plain look of these pants even if it does look terribly unfinished.
I blind stitched the hem, which was tricky over the serged side seams, but I managed with a leveler at the back of the foot.
Some notes for posterity on V8962.
I've now made all 3 items in this pattern and can say that I am quite pleased overall by the style, level of difficulty and fit. I made all three pieces in a size 20, although my measurements are that of a 22 and all three items feel a smidge big, especially the shirt. So, I think as far as knits go, I'm should be cutting 2 sizes smaller than my measurements dictate on the envelope.
One thing I have learned in school and at the company I work for is that most knitwear seams that are not simply serged actually sewn with a lock-stitch, not a stretch stitch. In production all the seams are merrowed (over-locked/serged) only, but when making samples or one-offs a straight lock-stitch is fine (with a ballpoint/jersey/stretch needle).
I used one of the stretch overlock stitches on my Bernina to attached the elastic and then stitched in the ditch at the center and side seams. I've been debating about weather or not to enclose the elastic entirely but I kind of like the clean, plain look of these pants even if it does look terribly unfinished.
I blind stitched the hem, which was tricky over the serged side seams, but I managed with a leveler at the back of the foot.
The fit is pretty good... I cut a size smaller than the envelope recommends for my measurements and I could almost go down another size (I did use the elastic guide for the next smaller size). The silhouette is spot on compared to the envelope sketch; a slim, but not tight boot cut pant with no details. Next time I would add 1" to the top of the rise at the center back waist... it feels lower than the front. There isn't much pitch to the waist, but I like the height of the front rise which is at my belly button, however the back dips down when I sit. I don't have much of a rear end to speak of so I think these are drafted for a very flat dress form.
I added 2" at the leg length adjustment line and 1" at the hem and my hem is 1". I would add another inch if next time to hem for wearing with heels. The current hem is a too long to wear with flats but feels a little short over my booties. I obviously need to determine the optimim inseam for flats vs heels.
Fall Sewing
So, I have some modest fall sewing plans, which will in all likelihood change by the time winter hits, but I thought I should post the plans here, and then see how well I'm able to make good on those plans. Whether or not I post the results in picture form is anyone's guess. I seem to be doing better with instagram these days. I am not tracking school projects because the weekly deadlines keep me pretty accountable.Current
Bra - I impulse bought the craftsy class Sewing Braws; Construction & Fit with Beverly Johnson on Saturday. I've had a pattern traced out and a fabric kit for who knows how long. I listened to the class while I finished up my ponte pants and then cut out the pieces needed. I am a bit horrified by the color of this fabric. At least I won't feel to precious about it while sewing. I do need to get some green thread though. I bought a cream colored findings kit and it came with some ivory lace but I don't think they look good together. I may try to find some black replacement findings, elastics and galoon lace.
Lisette princess seam dress – chambray
Kelly Green. What was I thinking? |
Lisette princess seam dress – chambray
Topstitch the side and shoulder seams. Hem. Neckline facing or binding. This is the last of my summer projects and although it is a transitional piece it's teetering in UFO territory. It' sooo close to being done. Need more discipline!
Baby Quilt
Piece the back and ship to longarmer for quilting. Trim the sandwich. Make and apply the binding by hand.
Hikaru – military
green felted wool (UFO from last year)
Topstitching of all exterior seams. Install sleeves (sleeve heads, shoulder pads
etc) and lining, buttons
Angela Kane Jeans
– black stretch denim (UFO from the year before last)
Queued
Ponte Knit Tube
skirt(s) – emerald ponte. Need more skirts.
Floral Silk Crepe de
Chine pants - Need some luxury fashion in my closet.
Tiny Pocket Tank
(blue silk w/ black hearts) – double dart modified size 18. Lengthen back shirt-tail.
Cotton burn out
nightie - kwik sew. Because I love the pattern and my last one is in regular rotation - husband likes it too.
Equilateral Triangle quilt - quilt along with a high school buddy
Finished
Ponte pants
Knit Striped Long Sleeve top
Knit Princess Seamed
Dress – For Knitwear class
Drop shoulder top –
for Knitwear class
TNT striped Knit Top.
Wednesday, September 10, 2014
Fall Sewing - Must Make Vol. 1 - Ponte Pants
I'm taking another class this semester at FIT. Originally, the plan was to take Fit Analysis as the last requirement for the pattern-making certificate program. However, the first thing that the teacher (who is also the chair of the technical dept) said on the first day was that if there were any of the students were already working technical designers than we did NOT need to take the class. Huh. So, she waived the class requirement and said I could swap it for one of the other pattern-making courses. That's when I started ticking off the classes I've already taken and realized that not only do I already have enough classes under my belt for the certificate already, but knitwear is about the only class I haven't taken yet. I could have just dropped Fit Analysis and applied for the certificate, but I decided I wanted to take Knitwear anyway. My current job is in cut & sew knits so the class will be very useful to me professionally and my sewing buddy Sara already took this class with the same instructor (who is a great teacher, btw) over at the New School a few years ago, and I LOVED her projects which she got to draft for herself. It's going to be a very interesting semester!
This is all a very long winded way of explaining why I am now setting aside my summer sewing and diving headlong into my fall sewing plans. The first item on the list is a pair (or two or three) of ponte pants. I hate wearing pants in general because RTW pants are always to short in the rise and leg for me. I know that the obvious solution is the make my own (duh) but extensive pant fitting does not excite me. But pull on ponte pants can't be too hard, right? They stretch and usually don't have more than the most basic of zippers plus some interesting seams. Since last winter I've stashed several pieces of ponte and collected a bunch of potential patterns (listed below) and I'm resolved to get to it!
McCalls - M6173.
These basic leggings from aren't high on my list, but
I feel like I should have a pair of these eventually.
via mccallpattern.mccall.com |
Vogue 8859 by Marcy Tilton,
The knee seams and the "jegging " details on the back give me pause, but I hear it's a nice fitting pant, though not very slim. I'm uncertain about sizing up or down to accommodate this fact.
via voguepatterns.mccall.com |
Donna Karan Vogue 1378
OMG, the style lines are amazing. I can't even. These will be mine as soon as I get over my fear of screwing up the fit. The wrap top is pretty fabulous too. If you spend any time stalking Donna Karan (or even DKNY) online you know how much I intend to $ave by making these myself.
I even made note of the fiber content, marched over to Mood and demanded some "Donna Karan" ponte in that precise blend.
via voguepatterns.mccall.com |
My current favorite: Vogue 1411, by Sandra Betzina.
This one has really good fitting tips in the written instructions. Sandra, you are awesome.
via voguepatterns.mccall.com |
And the one I'm actually going to make first, Vogue 8962
is as basic as it gets and I can try to get the basic fit of a ponte pants settled
so that I can tackle the other lovely patterns on this list with confidence.
Thursday, July 3, 2014
A Bright and Rosy Baby Quilt
I'm usually a selfish seamstress, but I think I might be a generous quilter.
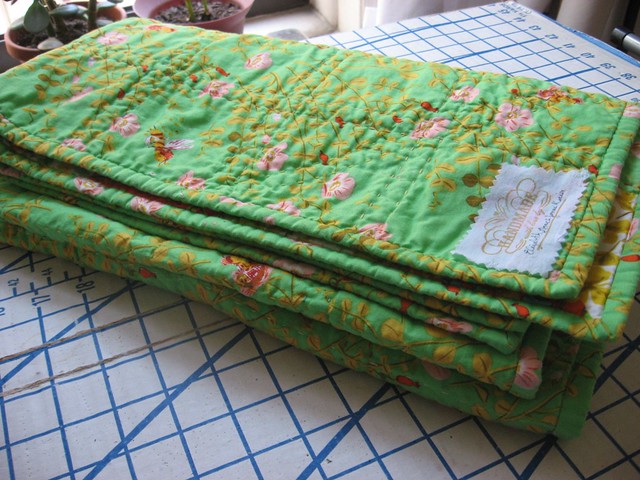
This cheerful quilt was just mailed off to it's new home and should arrive the day before this post goes up.
Not the final label |
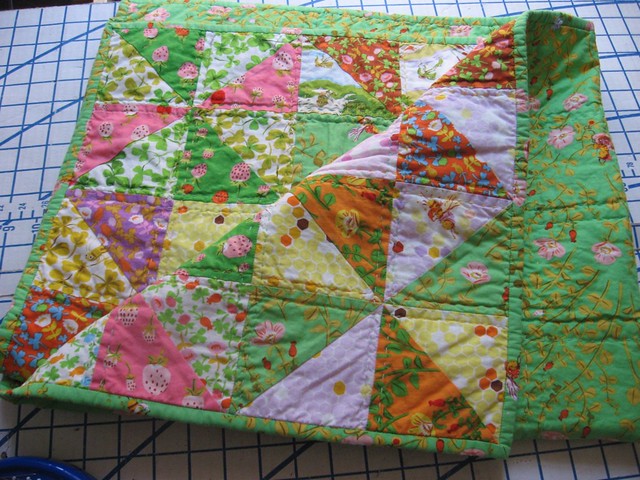
Even though I don't have space for a design wall there was a placement plan for the pinwheel blocks, at first.
After much obsessing, the colors were evenly dispersed and there were no same fabrics in too close proximity. That all went to heck the first row stitched together. I futzed with every row thereafter in reaction to the chaos, and eventually accepted that I really had no control over the outcome.
Luckily, it turned out darling, and even thought there is an area that swings more concentrated a white contrast, I am pleased with the overall movement and color placement. This is a happy quilt.
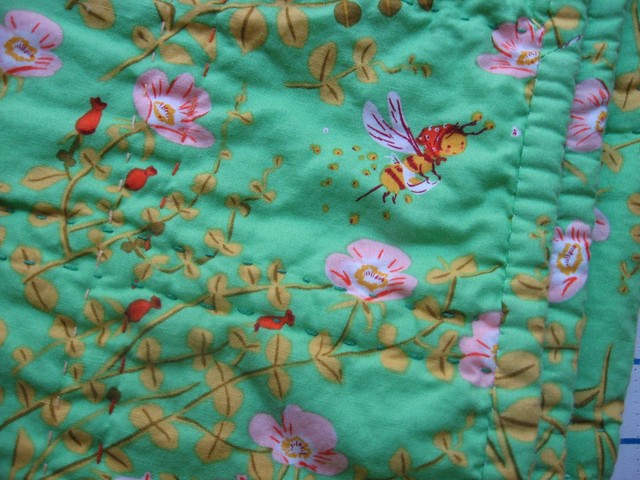
I hand stitched all the quilting lines with 2 strands of variegated DMC embroidery floss. It was what I had lying around and I was happy to use stash materials. The colors are not consistent across the entire quilt, but they are all complementary to the color scheme.
Congratulations Nate and Amanda!
Wednesday, May 7, 2014
An Anniversary Quilt
Once upon a time my Hetero-Life-Mate (awesome roommate) told me about a handmade quilt that had sadly been lost to her through circumstance. Understanding the importance of a cherished quilt, I was sympathetic and filed away in my brain the knowledge that she was definitely "quilt-worthy".
Fast forward to last year; my HLM and her fiance got married in Asheville (I was a bridesmaid!) At the time, I didn't have a wedding gift ready for them because, well, I suck at gift giving and hadn't found anything that felt meaningful, or special, or fun enough and I was way pressed for time.
After the weddings, I had a lot of fun working on the pinwheel quilt and quickly realized that I wanted to make them a quilt too. I could easily picture either of them snuggled up on the sofa with a kitty or two under a colorful quilt, or spread out under a shady tree reading.
Committed to the idea, then came the question of design/fabric. I knew the quilt should be colorful and bright and beautiful... something that reflected my friend's personality and our friendship. Eventually, I settled on a mystery quilt kit from Craftsy.com called Blooming Garden for Amy Butler's new egypt inspired fabric line. The pattern design went together very easily and in spite of a few hiccups, the quilt top was done very quickly.
Now, I'm a bit of a quilting newb, but this quilt had to be special, so I decided that having it professionally long-armed was going to be the best choice for finishing. After googling "long arm quilting service" I found Linda Lovett's fantastic website. She uses state of the art technology with her quilting machine, blogs the progress of each quilt, and is also located in the same state my friends were married. I sent her some photos of the finished top and we traded emails, chatted on the phone, and within a few days I sent the top and the pieced backing to her.
via Linda Lovett |
Apparently I did a good job prepping the top and Linda's generously sent my quilt to the top of her queue. (Thank you Linda for helping to make this gift extra special!)
The pantograph I chose is a feather pattern that I felt complimented the grey sparrow backing fabric and has nice movement. In less than a week the quilt sandwich was on its way back to me for the binding.
via Linda Lovett |
Back in my hands, I quickly trimmed the quilt sandwich and stitched on the binding. Then I hand stitched the binding closed on the back side and made a label to sew on.
I love my labels. I also love not doing my homework in favor of hand binding quilts. |
And here she is.
***Shortly after starting this project I got the terrible news that my friend's beloved dad passed away very unexpectedly. It's a strange and terrible feeling to know someone you love is suffering a profound loss and there is nothing you can say or do to lessen their sadness. All I could do was try to get the quilt done as soon as possible and send it to her. ***
****HUGS****. |
Even though I raced to finish the quilt as fast as possible, I enjoyed the process and am extremely proud of the results. While working on it I took the opportunity to meditate on friendship and family. I think this quilt is beautiful and a worthy gift for my dear friend and her true life-mate. I'm happy to finally send it to them and I hope they enjoy it for many years,
PS. All the finished pics were taken by my buddy Sara!
Sunday, April 6, 2014
Pinspiration; a Pinwheel Quilt
I should totally being doing my homework right now, but I'd rather share my latest FO.
So, sometime last summer I decided I needed a sewing project that would be the opposite of the wedding dress project. Something using 100% cotton, straight lines only, no fitting issues. A nice, pleasant project... I decided to make a quilt.
I took to pinterest with vigor and was taken by this simple charmer:
There was no link with the picture so I just used it as inspiration.
I bought a couple of charm-packs (2wenty Thr3e by Julie Comstock for Moda Fabrics) and got to work.
I finished the top last fall and then put it away while school and work took over.
Recently, I've become more interested in quilt making and with more quilts planned I decided to get this one finished in whatever stolen moments I could find. Here is the result:
The inspiration quilt placed the blocks "on-point" but mine are square
and I left off the outer borders. A nice little lap quilt meant for snuggling up on the sofa under, or draping over your shoulders for a photo shoot. I'm hoping this quilt sees lots of picnics and beaches.
The backing fabric is from a different line that I picked out at The City Quilter on the day that I tested out Bernina Sewing Computers. I ended up buying a Bernina 350 PE and I'm totally in love with the free hand system and the patchwork foot. I see a lot more top sewing in my future, but I digress.
The batting is 100% cotton and I machine quilted it with my Bernina walking foot which has a handy ditch stitch foot that I used in the ditches of the squares, block seams and diagonals. Quilting was kind of a pain so I think I'll send my next quilt out to be long-armed (but where?) instead. If I had more time I would totally hand quilt my next one, but I'm anxious to have that one finished for a variety of reasons so I think it's a job for the professionals.
The binding is one of the other fabrics in the line; it's grey with white vintage cameras. I hand stitched the back of the binding to the quilt. The handmade label is a stamp I got at Michaels.
It's definitely a charming quilt and I am quite pleased with myself.
I'm certain there will be another quilt finished in my near future, but for now... homework.
Saturday, January 4, 2014
"My" Quiche Recipe
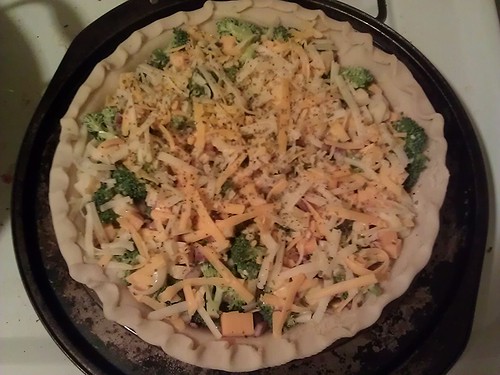
I say "my" recipe because like most things a person learns through practice it started out as a newspaper recipe** that is still pinned to my kitchen bulletin board for reference, but over time has been simplified and customized per my liking. The main thing to know about my quiche is that it is assembled in layers to control the distribution of ingredients. The only thing that is mixed is the last 4 ingredients.
2 heads of raw broccoli trimmed into florets.
4~5 oz shredded cheese (cheddar and pepper jack usually but I also like smoked gouda)
3~4 oz cubed cheese (usually less pepper jack than cheddar) (cubes should be about 1/4")
1 small red onion, diced
3 large eggs
1 cup half and half (but you can substitute some whole milk if you are low on half and half)
kosher salt
pepper grinder
Follow directions on pie crust box to prepare dough into a 9" pyrex pie dish.
Layer ingredients;
Spread a layer of shredded cheese on bottom (about half of the shreds).
Arrange broccoli florets evenly on top of shredded cheese.
Sprinkle most of the red onion evenly over broccoli. Don't be shy. Admire the colors.
Add cubed cheese evenly.
Sprinkle any remaining onion.
Spread remaining shredded cheese on top.
(I also added parsley on top per the hubs request... for color)
Crack the eggs into a mixing bowl. If you are me, dig out any shells.
Add salt and pepper to taste (consider the salt content of the cheese... don't over do the salt. I usually use a heavy pinch). **you could add sriracha or red pepper flakes here if you where so inclined**
Whisk in the half and half with a fork. My hub says this makes it fluffy so do whisk it!
Bake for 45 minutes, until top looks golden.
Let sit for 8~10 minutes before cutting with a pizza cutter.
Enjoy!
** The original recipe was printed in either the Metro or AM as a Mother's Day Brunch idea and had sauteed mushrooms and onions and some malarky about pre toasting the pie crust. The recipe was via Chow.com
Ingredients:
1 Pillsbury pie crust (the kind in the refrigerated section that comes in a box of 2, not a frozen shell)2 heads of raw broccoli trimmed into florets.
4~5 oz shredded cheese (cheddar and pepper jack usually but I also like smoked gouda)
3~4 oz cubed cheese (usually less pepper jack than cheddar) (cubes should be about 1/4")
1 small red onion, diced
3 large eggs
1 cup half and half (but you can substitute some whole milk if you are low on half and half)
kosher salt
pepper grinder
Directions:
Place rack in middle of oven. Preheat oven to 350F degreesFollow directions on pie crust box to prepare dough into a 9" pyrex pie dish.
Layer ingredients;
Spread a layer of shredded cheese on bottom (about half of the shreds).
Arrange broccoli florets evenly on top of shredded cheese.
Sprinkle most of the red onion evenly over broccoli. Don't be shy. Admire the colors.
Add cubed cheese evenly.
Sprinkle any remaining onion.
Spread remaining shredded cheese on top.
(I also added parsley on top per the hubs request... for color)
Crack the eggs into a mixing bowl. If you are me, dig out any shells.
Add salt and pepper to taste (consider the salt content of the cheese... don't over do the salt. I usually use a heavy pinch). **you could add sriracha or red pepper flakes here if you where so inclined**
Whisk in the half and half with a fork. My hub says this makes it fluffy so do whisk it!
Pour gently and evenly into pie. It won't look like it fills it up and the broccoli will look like it's too much, but have faith that the eggs mixture will puff up.
Let sit for 8~10 minutes before cutting with a pizza cutter.
Enjoy!
** The original recipe was printed in either the Metro or AM as a Mother's Day Brunch idea and had sauteed mushrooms and onions and some malarky about pre toasting the pie crust. The recipe was via Chow.com
Subscribe to:
Posts (Atom)