Pages

Tuesday, July 22, 2008

Help me! I don't know what to do!

I am nothing if I am not indecisive. It's a flaw of mine.
I bought a bunch of colors for the Confectionary tank and this is my swatch. 


In case anyone who might be reading this hasn't already seen it on my Ravelry page,  the yarn is Lion Brand Cotton-Ease in Stone, Lake, Turquoise, Violet, & Plum. I love that the colors are analogous, cool, and have a sort of ombre thing going on, but I do not dig the stone (light grey) next to the plum. It's too abrupt. I thought I'd add a cool pink to the palette to bridge the tonal gap. I added Blossom and to my project stash and I thought/think it looks pretty good. I decided to simply insert the Blossom between the Stone and the Plum and knit this pretty baby up.  


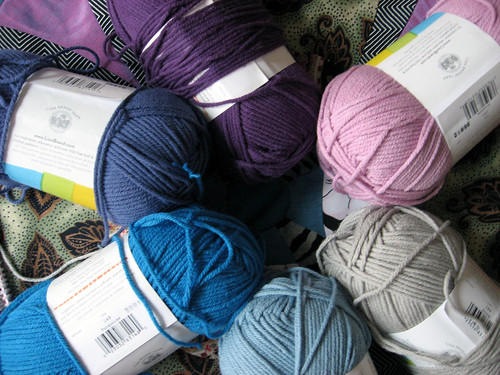
I cast on (while watching Bikini or Bust - how appropriate) and knit a bunch of repeats. Then I decide that I don't like the Blossom after all. The tone isn't deep enough to please my eye... and the added pink next to the purple is looking a little saccharine. (If Cactus and Lime had only looked better I would have taken the tank in the green/blue/purple direction.) 

I ripped out several repeats and decided to re-think my color pattern. I REALLY dig my swatch.... except for the Stone on Plum action. I decided to focus on what I liked about my swatch... the ombre-like order of the colors... and I've decided to have the colors vibrate back and forth between the Stone & the Plum. I'll use Stone for the trim  which will help to minimizing the effect of the purples. Great, I love it. 

I knit one half a repeat.... then I realize that I started with Lake... and I want the bottom color to be Stone. 
I also realize that this tank CURLS at the hem as stockinette only does (duh, Grace) and even though the project pics Show this, I don't like it. 

Incidentally,  I am very critical.... that might also be a flaw. 

So do I frog completely and start over with Stone? 
If so, should I knit a few rounds in Garter to make a firm bottom trim?
Do I proceed as is and pick up and knit a Stone border after the front and back are sewn together? Should it be garter? Or perhaps a short ribbed band?

I am paralyzed by indecision.

And since I can't decide if I should rip or knit, I switched to my neglected Bella Blouse.... which had previously caught me in the indecision trap... and I bravely cast on for the body in the round. I think I am in desperate need for some simple cotton stockinette for a bit. I'll have to blog about that later though.... I only have sufficient light/time in the morning for pics.

Monday, July 7, 2008

At home steam setting

This past spring I took a textile painting class at FIT. I didn't get a chance to steam my last project because I painted it on the last day of class, so when I had a chance (read: needed a break from knitting my Mesh/Rib Pullover) I steamed it at home in my kitchen. This is much more involved than it would have been in class, primarily because our kind TA did all the work for us. 


Taken in class while painting.


Rolling the painted silk in brown craft paper. Craft paper was purchased at Duane Reade. Blank newsprint would work fine also.


The craft paper wasn't very wide so I had to use 2 pieces over lapped. It was also very curly so I had to use my handy washer weights, my 2 hands and a foot. (I'm impressed that I was able to capture this moment on camera.) I left about a foot of paper at the end (center of the roll) to fold back over the inside edge of the fabric. I was careful to smooth out the fabric as it was rolled so that there won't be any wrinkles or dye transference.


Taped up the seam and the ends. It is important that the paper is permeable to the steam, and there is nowhere for water to splash directly onto the fabric.


I used this old stock pot (that I use ONLY for dyeing) filled about 2 inches with water, and placed my steamer on top of a shallow baking tin for additional lift. Once the water started to boil I coiled my paper wrapped silk and fit it gently in the pot, and was cautious to avoid splashes. I reduced the heat to low, and let steam for 2 hours.


I put a folded kitchen towel under the lid to prevent the condensation from dripping back onto the paper which could cause water marks if water seeped through onto the silk.


I think I did get a water mark or two because in the end the kitchen towel touched a small portion of the paper... but since my painting style is watery and I used some cool salt blending techniques it is hard to notice the spot and it doesn't really look like a mistake. I learn by doing and messing up anyway!


After steaming, I washed the painting in cold water to remove the excess dye. The most important thing I learned from my first project (not shown) is that the fabric/silk must dry so that it does not touch itself. Even when the water runs clear and it looks like all the dye is out, this is very important to avoid dye transference. It was kinda tricky to rig this set up in my bathroom so that the entire piece of fabric touched nothing but the clips. Luckily, silk dries very fast.


Some lovely details.


In case anyone wonders, I was inspired by the Gustav Klimt exhibit at the Neue Gallery - the Adele Bauer-Bloch painting in particular. I think the show is over now... but if it's not, I do recommend seeing Klimt paintings in person. There is a depth of texture in his paintings that simply cannot be seen in a photograph.

I used clear wax batik and gold Jacquard gutta resist, Senelier dyes, and a whole lot of kosher salt. I'm a bit of a control freak and I usually pre-plan projects, but since this was the last day of class I decided I needed to take advantage of the lab time and exercise my right hemisphere. There are things that I like and don't like about this piece, but it was good to get it done fast because I learned a lot that I can use next time.
Related Posts Plugin for WordPress, Blogger...